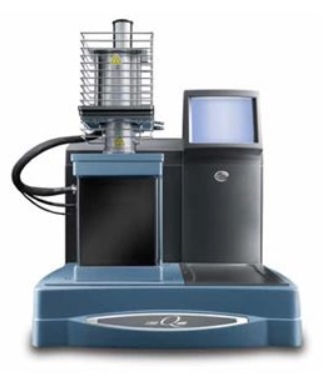
The TA Instruments - Thermal Analysis – DSC 250 Differential Scanning Calorimeter (DSC) measures the amount of energy (heat) absorbed or released by a sample as it is heated, cooled, or held at a constant temperature. Typical applications include determination of melting point temperature and the heat of melting; measurement of the glass transition temperature; curing and crystallization studies; and identification of phase transformations.
The temperature range of the TA Instruments - Thermal Analysis – DSC 250 Differential Scanning Calorimeter (DSC) is -90oC to 400oC.
CALCE employs a wide range of equipment to assess the mechanical properties of materials used in electronic packaging:
1. The TA Instruments Dynamic Mechanical Analyzer 850 is able to characterize dynamic mechanical properties, such as modulus, viscosity, creep, stress relaxation, and stress/strain behavior, over a temperature range of -100oC to 600oC.
2. The CALCE Thermo-Mechanical Microstructural Analyzer (TMMA) test apparatus was developed by CALCE for characterizing various solder compositions as well as other materials (e.g. die attaches, conductive adhesives, underfills). A solid-state actuator allows displacements with a resolution of less than 10nm and load resolution of less than 0.05N. The test frame allows for in-situ microstructural observations, which are an important part of understanding the root cause mechanisms which contribute to failure.
Non-Destructive Evaluation
| Electrical Testing| Non-Destructive Evaluation| Destructive Evaluation| Contact Us|

Fourier Transform Infrared Spectroscopy
CALCE performs Fourier transform infrared (FTIR) spectroscopy with an Agilent Cary 670 FTIR Spectrometer, which is a tool for characterizing and identifying organic materials-those containing carbon or hydrogen atoms. These atoms are highly susceptible to infrared (IR) radiation and emit specific vibration frequencies based on their compounds-much like a fingerprint. This allows CALCE to:
- Characterize chemical materials
- Identify organic materials and polymers
- Observe degradation of lubricants and capacitor electrolytes
- Perform counterfeit detection
- Study the contamination of electronic components
Because we are able to use the 670 to analyze specific materials' fingerprints, we can perform counterfeit tests by comparing the frequencies of an original sample with a suspect sample. In conjunction with the IR spectroscopy, we use attenuated total reflection (ATR) to directly examine materials-solid or liquid-with minimal sample preparation. The Cary 620 FTIR Microscope allows us to do imaging and mapping to identify chemical information
and study very specific areas and map functional groups.
For more information on services we can provide through FTIR spectroscopy, please contact us

Agilent Nano Indenter G200
CALCE uses an Agilent Nano Indenter G200 to measure material properties such as hardness, modulus and creep. The G200 can measure a wide variety of hardness, including polymeric, ceramic and metallic materials. The indenter uses a Berkovich tip, with an apex of only 20 nanometers and has a maximum force of 10 Newtons. At CALCE, we have been using this for the measurement of the mechanical properties of solder alloys-specifically lead-free solder alloys-for simulation purposes.
We also use the G200 to:
- Study the creep of solder alloys
- Study the mechanical properties of polymeric materials
- Study the susceptibility to crack in multilayer ceramic capacitors
- Observe material delamination through scratch testing
- Perform continuous stiffness measurements
The G200 is equipped with a heating stage, which allows us to perform crack and indentation tests at a wide variety of temperatures-up to 350 °C. We can also measure force in the x and y axes, which allows performing scratch tests.
For more information on services we can provide through nano indentation, please contact us.
 The TA Instruments Q400 Thermo-mechanical Analyzer (TMA) is the industry's leading research-grade thermomechanical analyzer with unmatched flexibility in operating modes, test probes, and available signals. The Enhanced Mode (EM) allows for additional transient (stress/strain), dynamic and Modulated TMA experiments that provide for more complete viscoelastic materials characterization plus a way to resolve overlapping thermal events (MTMA). The Q400 delivers the same basic performance and reliability as the Q400EM but without the latter's advanced features. It is ideal for research, quality control, and teaching applications.
Typical applications include coefficient of expansion, softening point, glass transition determinations, and modulus measurements.
The temperature range of the Q400 is -150 oC to 1000 oC.
Non-Destructive Evaluation
| Electrical Testing| Non-Destructive Evaluation| Destructive Evaluation| Contact Us|
Contact Resistance Measurements
The reliability of electronic systems is largely influenced by the ability of the many contacts and connectors within the assembly to maintain a connection resistance below a prescribed "threshold" value. Common degradation mechanisms, such as growth of oxide films, pore corrosion, and stress relaxation, can lead to increases in contact resistance and eventual failure of the system. Contact resistance measurements are used to assess the risks of using various contacts and connectors. The Automated Contact Resistance Probe (ACRP) at the CALCE was developed, with assistance from AMD and Bellcore, for this purpose.
Contact resistance measurements require the ability to measure very small fluctuations in resistance while simulating actual operating conditions. The ACRP ensures accurate measurement by using a computer-controlled loading system designed to apply a vibration-free normal force to the contact surface. This loading system has an adjustable loading speed and has a range of 0 to 2200 grams, with a resolution of less than 2 grams. Contact resistance is measured using a computer-controlled, high resolution power supply and measurement unit, which can deliver 1nA to 1A of current at a voltage varying between 0.1mV to 110V. If contact measurements need to be made at a higher current rating, which may be warranted for a field application, an appropriate source unit can be added to the existing setup.
The ACRP conducts resistance measurements in real-time, enables measurement using actual contact geometries, and can simulate the repeated mating and unmating cycles experienced in separable connectors. This "wipe" motion is accomplished through automatic x-y positioning. This computer-controlled displacement has a resolution of 0.2 mm and allows for multiple measurements of a single point (cyclic loading) or over an entire contact surface (automatic multi-point contact).
Cyclic Loading: This capability enables mating/unmating and loading/unloading test of connectors. The ACRP at CALCE can detect real-time change in the contact resistance vs. normal force relationship in each individual mating cycle.
Automatic Multi-Point Contact: This capability allows a determination of the distribution of contact resistance as a function of contact location. Multiple measurements are needed to obtain an accurate assessment of the contact resistance behavior. The environment is a critical factor in contact resistance and often accelerates common degradation mechanisms. The ACRP allows the user to measure contact resistance real-time while subjecting the connector to a range of temperatures and humidity designed to simulate or accelerate actual field conditions. This is critical because failure mechanisms, such as fretting corrosion, depend on the synergistic effect of micromotion, temperature, and humidity.
The use of a mixed flowing gas (MFG) chamber enables accelerated assessment of contact failure mechanisms due to corrosive environments

X-Ray Fluorescence Spectroscopy performs elemental analysis on materials at standard temperature and pressure. The material is excited with a broad spectrum (Bremsstrahlung) X-ray source. The instrument measures the energies of the emitted X-rays from the atoms making up the material as they relax. The energy spectrum and the intensities of the emission lines are used to identify the elemental composition and perform quantitative analysis. Elements with atomic numbers below phosphorous have too low fluorescence efficiencies for detection.
The BOWMAN B Series is a top-down measurement configuration instrument. Materials are manually positioned on a fixed stage by video camera and site selection is by crosshairs.


 The TA Instruments Q400 Thermo-mechanical Analyzer (TMA)